
Need to learn how to strap an ankle for an upcoming game or match? Not sure how to do so? Then read for our step-by-step guide to ankle strapping!
Steps to Strapping an Ankle
There are five main steps and techniques to strapping an ankle. The image below walks through each steps, or you can read the steps in detail individually after that. There is also a video at the end taking you through each step – so you can pick your preferred format!
How to Tape an Ankle: Step-by-Step
1. Prepare the Area
Preparing the area before strapping your ankle is essential to ensure that the tape sticks properly, provides the necessary support, and minimises skin irritation. Here’s what you need to do.
Clean the skin
Begin by cleaning the ankle area thoroughly. This removes any oils, sweat, or dirt that might prevent the tape from sticking properly. You can use soap and water, then dry the area completely, or use an alcohol wipe for a quick clean.
Check for injuries
Before strapping, always inspect the ankle for open wounds, blisters, or any skin conditions. If there are open wounds, they should be covered with a sterile dressing or bandage to prevent infection and irritation.
Shave the area
If the ankle area is particularly hairy, it might be a good idea to shave the area for better tape adherence. This will also make tape removal less painful – believe us!
Apply pre-tape underwrap (optional)
Some people have sensitive skin that might react to the adhesive on the tape. In such cases, using a thin layer of foam underwrap can protect the skin. This underwrap also helps remove the tape afterwards.
Position the ankle
The ankle should be placed in a neutral position, which means it should not be pointing up (dorsiflexed) or down (plantarflexed). This neutral position ensures that when the tape is applied, it provides support without restricting necessary movement too much.
Use adherent spray (optional)
To ensure the tape sticks well, especially during active movement or sweating, an adherent spray can be applied to the skin before the tape. This helps increase the tape’s grip on the skin.
Have all materials ready
Before you begin the taping process, ensure all your materials like tapes of different widths, scissors, underwraps, etc., are within arm’s reach. This ensures a smooth and uninterrupted taping process.
By properly preparing the ankle before strapping, you ensure that the tape provides optimal support, remains in place during activities, and minimises potential skin irritations or allergies.
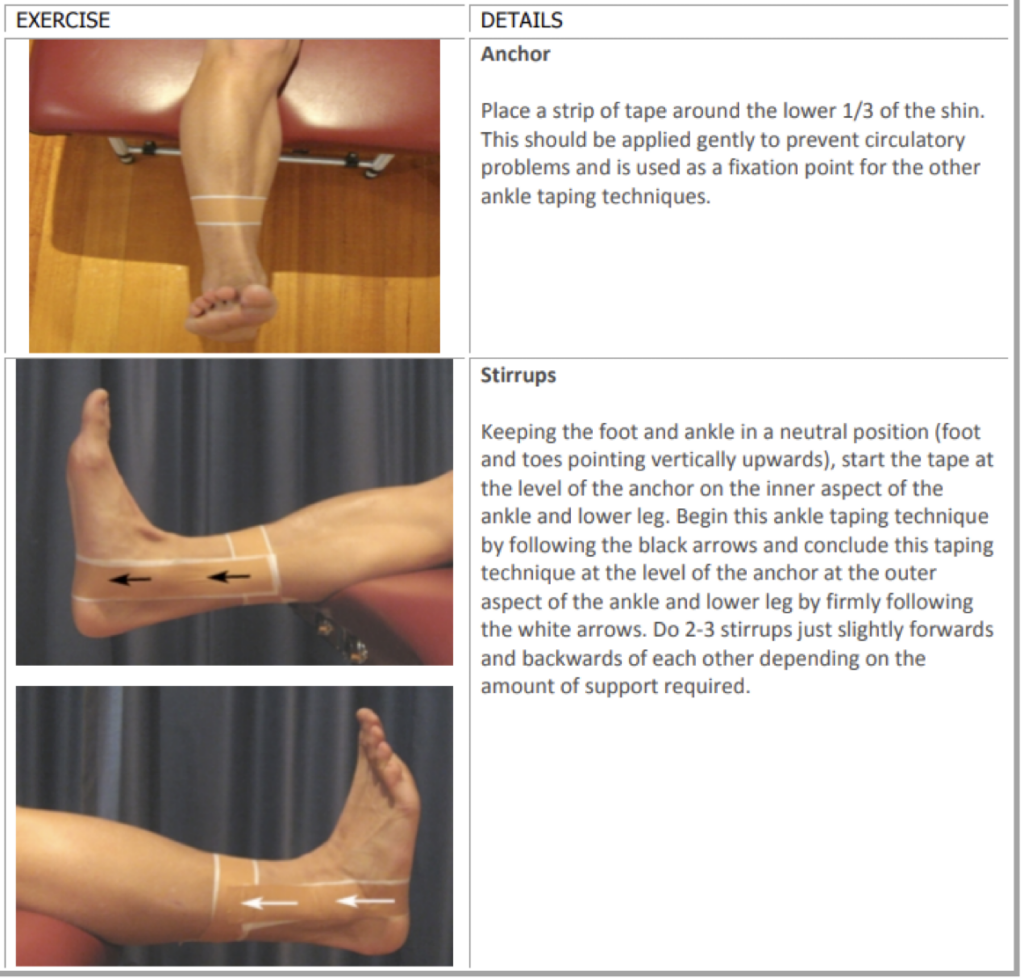
2. The anchor
The anchor in ankle strapping serves as a foundational support, ensuring the subsequent strips of tape hold firmly in place.
To create an effective anchor, use a strip of tape and wrap it around the lower 1/3rd of your shin. Make sure to not apply too tightly as this can cut off blood flow (see images above for more detail)!
3. Stirrups
Start from the inside of the anchor, pull the tape downwards, hugging the contour of your heel, and then back up to the opposite side of the anchor. This “U” shaped application provides lateral and medial stability to the ankle, helping to prevent excessive side-to-side movement. Typically, 2-3 stirrups are applied, slightly overlapping in either direction, ensuring comprehensive support without restricting necessary ankle flexibility (see images above for more detail).
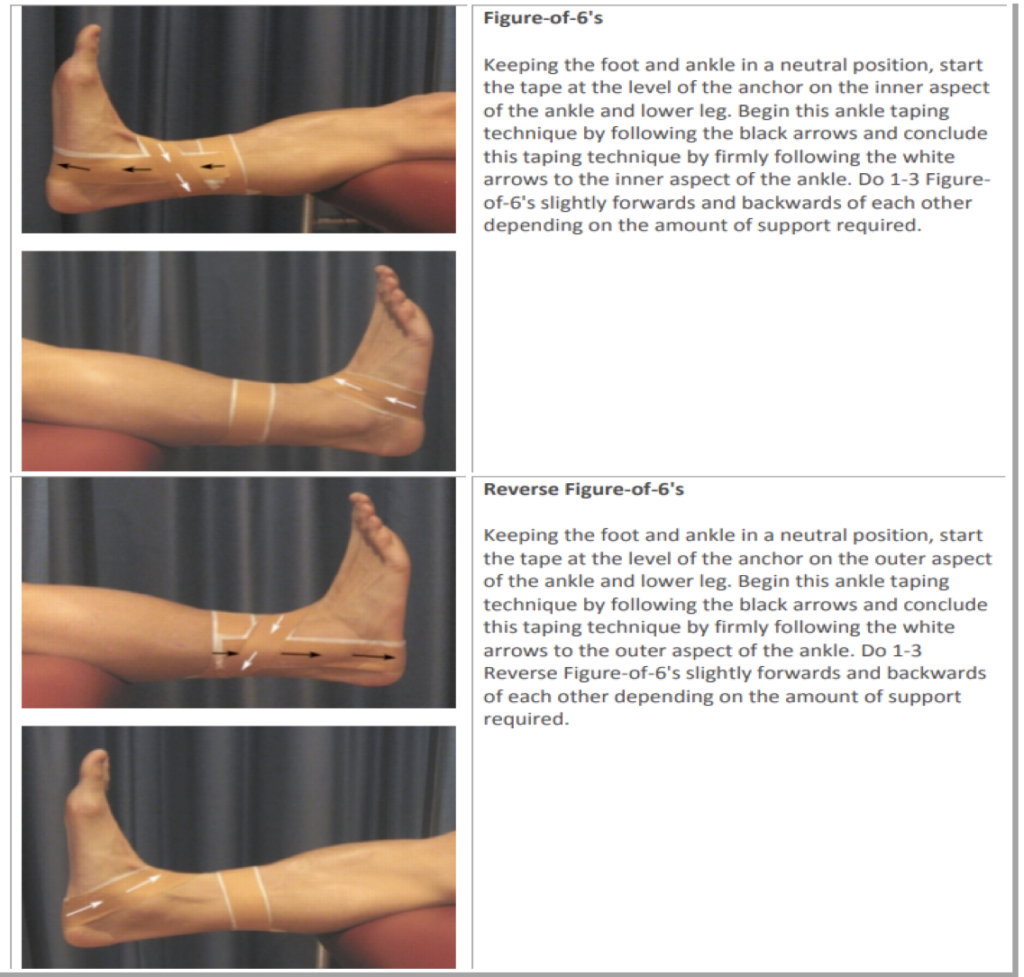
4. Figures of 6
Beginning from the anchor on the inside of your ankle, the tape is applied straight down towards the arch of your foot, wrapping under the foot’s ball and then travelling diagonally upwards to finish on the outside of the anchor. This technique creates a ‘6’ like pattern on your ankle. By crisscrossing the joint, figures of 6 ensure both vertical and horizontal support, reinforcing the stirrups’ function and adding an extra layer of stability during movement. Repeat 1-3 times, overlapping each repetition slightly (see images above for more detail).
5. Reverse figures of 6
Reverse figures of 6 are strapped identically to a normal figure of 6, but starting from the outside rather than the inside of your ankle. You can repeat these 1-3 times also, depending on how much rigidity you’d like to add (see images above for more detail).
Ankle Strapping Video
For those that want a video walkthrough of the ankle strapping process, see the video. This helpful guide was performed by Vitali Kanevsky, one of our resident physiotherapists here at Benchmark Physio!
Do You Need an Ankle Physio?
Ensuring your ankle is properly strapped can be the difference between a great game or workout and a serious injury. While this guide offers a comprehensive step-by-step approach to ankle strapping, it’s equally important to listen to your body. If you’re feeling persistent pain or discomfort, it might be time to consult with a professional ankle physio. At Benchmark Physio, our team of experienced physiotherapists in Sydney is always ready to assist you. Whether it’s for guidance on strapping techniques or comprehensive physiotherapy treatments, our doors are always open to support your journey to optimal physical well-being. Book your appointment today and prioritise your health!